Basic Watchmaking Tools Guide
As an aide for those who are interested in giving watchmaking a try, or who are just starting out, I have created this guide covering the essential tools necessary to perform a basic watch service. To perform a basic watch service, you need to be able to:
Open the case and remove the movement, dial and hands
Fully disassemble the movement
Clean the movement
Reassemble the movement
Regulate the movement
Reinstall the dial and hands, and replace the movement in the case
This guide covers a minimal set of tools that will allow you to complete these essential steps in the majority of cases. I will publish a separate guide for more advanced (and, potentially, more expensive) tools that can make the process easier or allow you to address some more challenging situations, but the items listed here will get you started without a huge investment and are the things I reach for most often when working on watches.
Contents
Core Essentials
Screwdrivers
Along with tweezers, no tool is more heavily used in watchmaking than the humble screwdriver. Watch movements are largely screwed together, so you will be using your screwdrivers constantly during the disassembly and reassembly processes. Because they are such a critical tool, I advise investing in a good set by a company that specializes in watch tools like Bergeon or Horotec, although you can probably get by with Chinese knockoffs if you need to minimize costs. Bear in mind that your screwdriver tips will get worn down and, eventually, won’t grab screws properly, so it’s a very good idea to get screwdrivers with replaceable tips. You’ll also want to make sure your screwdrivers have rotating finger rests on the back, as they’re difficult to use otherwise.
In my experience the most commonly used/useful sizes are 0.80, 1.00, 1.20, 1.40, and 1.60mm. Every so often you may run into a particularly tiny screw that will require a 0.50mm screwdriver, but those are relatively uncommon. Larger sizes are nice to have, and keeping one or phillips bit screwdrivers around is a good idea, but for the most part you’ll be covered with 0.80-1.6mm flat heads.
You can buy watch screwdrivers individually, or in sets that cover the most common sizes. There are expensive sets that come with rotating holders, but you don’t really need this. Personally, I use Bergeon Ergonomic screwdrivers:

Tweezers
Along with screwdrivers, tweezers will be your constant companion when working on watchmaking. As with screwdrivers, it’s a good idea to have at least one good “go-to” pair, since this is such a critical tool. It’s also important that you feel comfortable with your tweezers and that they give you good control over the parts your holding - it’s all too easy to drop things, or, worse yet, send tiny parts flying across the room if you don’t have a good “feel” with your tweezers. There are A LOT of different options here, and over time you should experiment and will likely accumulate multiple sets that you like to use in specific scenarios. Here are some things to consider as you’re starting out:
Given how simple they are, you can probably get away with cheap tweezers to get started, but tweezers from reputable Swiss brands like DuMont (my personal go-to), Horotec, or Peer Vigor will tend to give you slightly better feel and more precise tip alignment, which really matters when you’re picking up tiny parts.
The most common material is stainless steel, which has a good combination of strength, sensitivity, and low cost, and this is a good place to start. You should probably have at least one set of fine tip stainless steel tweezers. Personally, I like the DuMont 3c as a good, versatile “do everything” tweezer.
There are some alternate tweezer materials to consider as well. Brass tweezers are non-magnetic less likely to scratch the metal surfaces of watch movements, but they’re heavy and the tips aren’t as durable, so I don’t recommend them as an “every day” tweezer. You can also get titanium tweezers. I love these and use them extensively - they’re very light, have unparalleled feel, don’t magnetize, and don’t scratch things as easily as stainless. The downside is that they can be expensive and the tips are delicate and easy to bend out of shape.
You should have at least two pairs of tweezers handy, as some operations will require you to use tweezers in both hands.
It’s a good idea to have a “heavy duty” pair (e.g. a DuMont 00) that allow you to apply signifincant force without damaging the tips. These will be useful for tasks like inserting mainspring arbors or re-setting canon pinions.
It’s also a good idea to have one pair that is specialized for holding delicate, easily scratchable items like watch dials & hands. You can get pairs with wooden, nylon, or rubberized tips for this.
Finally, it’s a good idea to have at least one cheap or well-used pair lying around that you don’t mind using in (hopefully uncommon) situations where some damage to the tips may be inevitable.


Movement & Parts Holders
Having a solid base to hold the movement you’re working on is incredibly important, so getting at least one movement holder is essential. You can find cheap adjustable movement holders for less than $10, but in my experience you tend to get what you pay for here, and cheap holders don’t always hold very well. You’ll also be adjusting it a lot (for example, while flipping the movement over), so you’re likely to get frustrated pretty quickly with something that doesn’t have a smooth clamping action. The OG of movement holders is the Bergeon 4040, which will fit all but the hugest or tiniest movements, comes at a quite reasonable cost, and is highly recommeded. One alternate approach, if you have a 3D printer handy, is to print holders for specific movement sizes you are working with. There are parametric models already available for movement holders online.
It’s a really bad idea to let watch parts simply sit out on your work surface for any length of time. This is because parts left in the open will inevitably attract dust, but more importantly it only takes one careless act, or a curious child or pet, to send tiny parts flying off to places where you are unlikely to find them, at least without an exhaustive and frustrating tour of your room with a flashlight and a magnet. You really need to have at least one parts holder to help keep things secure and organized. These are compartmentalized, usually with six compartments arranged in a circle, and have a lid to help keep everything clean and in-place. I explain how I personally organize parts in these holders in my overview of the watch disassembly process. Anyway, they’re cheap insurance, so get a couple.


Vision Tools
Watchmaking is pretty tough if you can’t see what you’re working on. Even if you have amazingly good vision (I don’t), you will struggle to see well enough to align tiny parts without some kind of magnification. The traditional tool for this is the jeweler’s loupe. These are still used extensively by modern watchmakers, and they’re relatively inexpensive. They are available with various maginification levels, but I find that loupes in the 3x to 6x range are the most versatile. If you go this route you will also want a loupe holder of some type (there are different options, some of which work with prescription glasses) to hold the loupe in front of your eye. Loupes do have some downsides, however - primarily the fact that they have short focal lengths, so they require you to move your head/eye very close to what you are working on, especially at higher magnifications. This can get pretty fatiguing, especially if you don’t have a workspace that’s set up for it.
Early in my watchmaking journey I aquired an inexpensive inspection microscope - the sort with a small LCD screen - in order to supplement my collection of loupes. As time went on I started doing more and more work underneath this scope, until, ultimately, I put my loupes away and started using it exclusively as my magnification tool. Working under a microscope takes a bit of getting used to, from a hand-eye coordination perspective, but ultimately I found it more comfortable, versatile and better for my posture than using loupes. There is an added benefit in that most of these inexpensive inspection microscopes are capable of capturing photos or video, which is useful as a reference or for sharing your work with others. If you decide to purchase one of these, make sure it has a lens with a broad focal range and good magnification, so that you have plenty of room underneath the lens to work, use screwdrivers, etc. Also, make sure to choose a mounting system that works well with your workspace setup. You don’t want a microscope stand sitting right where you want to put your movement, so mounts that clamp to the side of a desk, with adjustable arms, are generally a better bet. Also, make sure your microscope has a bright, adjustable lighting source such as a ring light. Other bells and whistles like autofocus aren’t really that important.


Work Surface
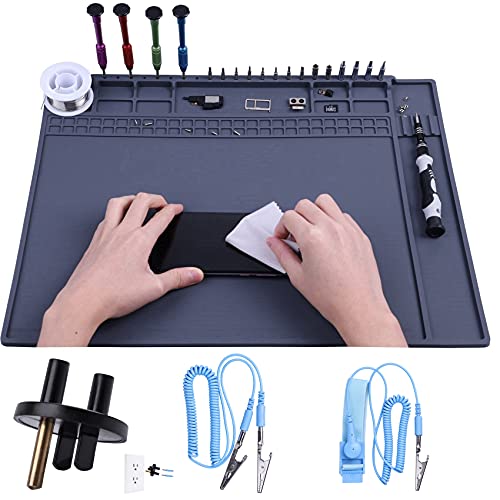
While you can certainly work on watches directly on your desk or table, this isn’t really recommended. Having a good, clean work surface specifically for your watchmaking tasks will make the process significantly easier, and will also help prevent you from losing or misplacing small parts. The industry standard work surface for watchmaking is a series of mats made by Bergeon. These typically come in green, which helps with parts visibility, but can be had in other colors.
Personally, I never got along that well with the Bergeon mats. Although they are supposedly anti-skid, I found the surface to be annoyingly slippery, and their relatively small size can make your work area feel a bit cramped. I eventually switched over to using silicon work surfaces that were made for soldering and electronics projects. These are cheaper, have a larger surface, include a raised lip that helps retain parts, and usually come with convenient parts and tool organizers around the perimeter. Most importantly, the surface provides much better grip, which helps to keep things steady when working. As a final benefit, the soft surface makes it easy to get tweezers underneath parts that are lying on the mat.
These mats do have some downsides, however. They are significantly more difficult than the Bergeon mats to keep clean, and the rubberized surface can act as something of a trampoline when small parts are dropped on it.
In addition to your main work surface, you will occasionally need a hard, metal surface to work on. A watchmaker’s anvil is a small steel block, typically hexagonal in shape, with various size holes drilled in it. For a simple piece of metal, these are very useful for a number of tasks.
Conversely, you will occasionally want a very soft, forgiving surface that minimizes the chance of damaging or scratching delicate parts. For this you’ll want to have a watch case casing cushion, which is a round pad made from a soft gel substance. The Bergeon 5395 is the mac daddy of case cushions, but a cheaper alternative should work fine.


Other Core Tools
There are a few additional odds and ends you’ll want to have handy for working on watch movements. Foremost among them is the humble plastic pointer. This has many uses, including holding or setting small springs (to keep them from flying away), applying light pressure to help set bridges and align pivots, and pushing on things that you don’t want to scratch, like regulator arms.
A similar tool you’ll want to have handy is a supply of pegwood. These are small (typically orangewood) sticks that can be whittled to a sharp point using a knife, and which can be used in any situation where you need a sharp point without scratching or damaging delicate components. Since the pegs can be re-sharpened many times, you don’t have to worry about dulling, damaging, or dirtying the tip. Pegwood is often used as a manual cleaning tool for this reason (see below).
To avoid getting fingerprints on nice, clean movement parts, wearing finger cots during the reassembly process is recommended. You may need to experiment a bit to find the right brand/size for you: they should fit snugly on your finger tips but not cut off circulation. I really prefer cots made of natural, rather than synthetic, latex. These tend to be thinner, so they tear more easily, but I find they provide better feel and comfort.


Basic Case Tools
Watch Strap Removal & Installation
One of the first things you frequently need to do when you start working on a watch is to remove the watch band. Most watch bands are held on to the watch lugs by telescoping metal posts called springbars, and you’ll want to have a good springbar tool to compress and remove them. These come in several forms, including tools with dual arms that are designed to compress both side of the springbar at the same time, but it’s hard to beat a simple, strong tool like the Bergeon 3153.


Screw Back Cases
Many screw back cases can easily be removed with nothing more complex than a simple rubber ball. This method has the advantage of working on any screw on caseback, independent of the exact design, and is also gentle on the caseback itself, so it should probably be your first resort. However, some stubborn casebacks will require use of a more specialized caseback removal tool that clamps on to the divots, or similar features, in the caseback to provide leverage. A simple, hand held caseback tool is probably a good place to start. There are also much more elaborate (and larger/more expensive) bench top tools for this, which we will cover in the Advanced Tools Guide. Finally, if all else fails, you can usually remove really difficult screw on casebacks by supergluing a socket to the case. Yes, this really works, and the glue can be removed completely after the back is off with acetone.
Regardless of what tool you use to remove a screw on caseback, I strongly recommend that you reinstall it with the rubber ball to avoid overtightening, unless you really need to tighten it more for waterproofness (not something I bother with for vintage watches).


Snap Back, Snap Bezel, and Clamshell Cases
Even simpler than screw back cases, many watch cases have backs or bezels that simply snap into place. In order to open them, you simply need to insert a sharp object into the appropriate gap and apply leverage. You don’t need a special tool for this, but in order to minimize the possibility of scratching or damaging the case, it’s a good idea to have a simple case knife handy. As with screw-on cases, there are much more elaborate tools that can be used to remove snap-on cases or case bezels, and which minimize the chances of damaging something, but we will save those for the Advanced Tools Guide.

Hand Removal & Installation
In order to get the dial off of a watch movement, you first need to remove the hands. These are simply press fit onto the corresponding posts that poke through holes in the dial, but they need to be removed with care, since both the dial and hands are delicate and easy to damage. You will want a set of dedicated hand levers to reach underneath the “collar” of the hand and gently lever it up. You will also want to protect the dial while doing this, and while they sell purpose-made dial protectors, they’re really unnecessary - a piece of clear plastic cut off of a ziplock bag, placed over the dial and hands, works just as well. As always in watchmaking, there are more elaborate hand removal tools out there, some of which allow you to, for example, remove just the second hand without disturbing the underlying minute or hour hands. However, it’s hard to beat a good set of hand levers. In fact a good set of hand levers can also be used (carefully!) in place of more specialized movement tools to do things like removing canon pinions or press-fit gears, so they’re actually quite versatile. Given all that, although there are really cheap options out there, this is one of those tools where I recommend that you spend a bit more to get good quality.
To reinstall the hands when you are finishing up you’re work, you’ll need some hand setting tools. In their simplest form, these are just hollow pointer tools with different diameters that can be used to push the hands down onto their posts. Again, there are more elaborate tools out there, but IMO simple is better in this case. These tools can also be used to help gently install certain press-fit parts in the movement as well. I use the Bergeon version of these tools, but given their simplicity you are probably fine with cheap knock-offs here.


Basic Cleaning Tools
Ultrasonic Cleaning
One of the most important steps in getting a watch movement to run really well is thorough cleaning of the movement following disassembly. This is done by washing the parts in a series of solvents. Traditional watch cleaning machines rely on agitation of the parts, usually by spinning them rapidly while immersed in a cleaning or rinsing solvent. However, dedicated watch cleaning machines, even used, vintage models, are bulky and expensive. While there are relatively affordable devices that can emulate the cleaning action of a traditional watch cleaning machine, today we have what is (IMO) a more effective method - ultrasonic cleaning. Rather than agitating the parts, ultrasonic cleaning works by bombarding them with high frequency sound waves, which directly loosen and remove surface contaminants. These waves penetrate into even very tiny crevices, so it’s a highly effective method for cleaning watch parts. Even better, the equipment is relatively affordable, and can also be used to clean watch cases & bands, as well as jewelry and other household items.
If you go the ultrasonic cleaning route, you will want to get a commercial-style ultrasonic cleaner. It should be large enough to hold a large beaker of cleaning fluid - you won’t want to try to fill the tank with cleaning fluid directly. Instead, the tank is filled with plain water, and cleaning fluids (as well as the watch parts to be cleaned), are placed in smaller containers that are good at transmitting the ultrasonic energy to their contents. I recommend pyrex beakers for this, as thin pyrex glass is nearly transparent to ultrasonic waves. You will want several of these beakers - enough to hold all of the cleaning fluids that you plan to use. for simplicity, the fluids can be stored inside the beakers until they need to be changed out. I use cheap silicone lids to faciliate this. Finally, you will need mesh baskets to hold the watch parts. I have found that the cylindrical watch cleaning baskets designed for dedicated watch cleaning machines work well for this as they fit neatly inside the tall 600ml pyrex beakers that I use. I have fabricated a simple hook from a metal clothes hanger in order to move the cleaning basket in and out of the beakers. You will also want several smaller baskets that can be placed inside the larger cleaning basket to hold small parts and keep them organized. I like the screw-together style because they’re more secure.
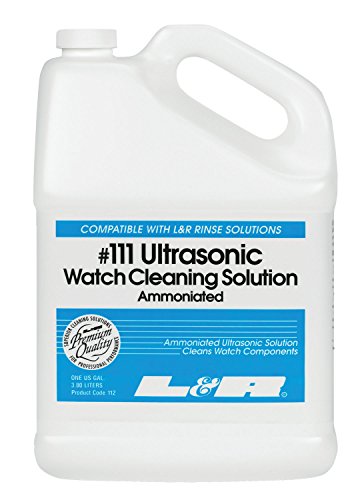
As for cleaning fluids, there are many potential options, but for movement parts I like to use L&R ultrasonic cleaning and rinsing solution, followed by a final rinse in 99% pure isopropyl alchohol (please note that IPA can soften the shellac used to hold pallet jewels, so the pallet fork should not be cleaned this way). For case parts I generally use a mixture of water and Mr. Clean, which was recommended by a jewler acquaintance - it’s inexpensive, effective, and leaves little to no residue. A 50/50 solution of water and white vinegar in the ultrasonic is great for removing oxidation from brass cases.
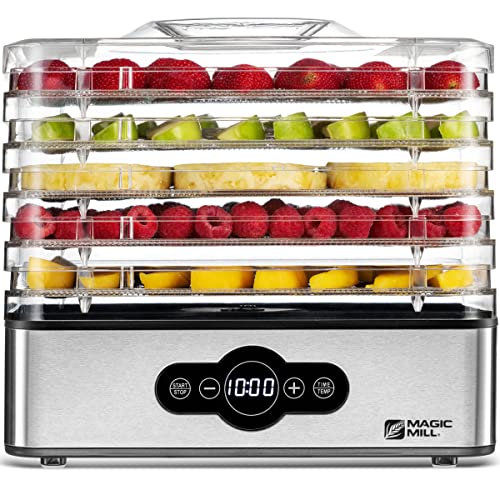
To dry the parts after cleaning, I use a cheap stackable food dehydrator, first removing the trays from the cleaning basket so that they will fit under the dehydrator lid.
These processes will be covered in much greater detail in my Cleaning Guide.


Bench Cleaning Tools
Supplementing your main parts cleaning setup, you will also want some cleaning tools and materials that you can keep handy at your workbench for pre-cleaning, spot cleaning, and cleaning of items that can’t be cleaned effectively in your ultrasonic or other watch cleaning device. This includes:
An anhydrous, quick-drying bench solvent that you can use to remove oil and residue from selected parts, including pallet forks, jewels, and balances. One-dip is a popular choice here, but I use generic Hexane, which is significantly cheaper. Just make sure you have adequate ventilation in your workspace before working with these. You will also want a few small glass lidded solvent containers for cleaning small parts and possibly a larger air tight solvent container to hold a supply of your solvent at the ready.
A supply of watchmakers tissue squares - sheets of fine, lint free tissue that are useful for quickly drying items that have been immersed in solvent, as well as other cleaning tasks.
Some Rodico, a special watchmaker silly putty which is extremely useful for cleaning up excess oil and grease on movements, picking up small parts, and even holding odd-shaped items you are working on. For example, I use a bit of Rodico to hold watch hands when I am re-luming them.
Pegwood for cleaning dried up oil off of jewels, removing/loosening dirt in case crevices, etc.
A supply of soft, lint-free (foam tip) swabs for cleaning delicate parts, including dials and hands.
A small cleaning brush.
A few fine microfiber cloths, for general cleaning and polishing tasks.
A simple manual air blower for removing dust (e.g. before closing up cases and bezels).


Basic Lubrication Tools
Watch Oilers and Oil Cups
Watch oilers are small metal probes with tips that are designed to pick up a miniscule amount of oil and deposit it exactly where it is needed. They are essential tools for watchmaking. They come in several different sizes, and I recommend having a selection of different sizes available for different tasks. You will need to be able to clean the tips of your oilers in between uses, especially if you are using them with different lubricants. While they make special foam blocks for this, I have found that a simple melamine sponge (i.e. Mr. Clean Magic Eraser) works just about as well. Since melamine is quite light, I have also 3D printed a plastic holder to give the sponges a bit more heft & structure. I store my most-used oilers by sticking them in the melamine sponge block when not in use.
You will also need a set of oil cups to hold and store ready quantities of oil on your bench for use with the oilers. These are lidded to help keep the oid clean in-between uses. I recommend labeling them so you know what kind of oil or grease is stored in each one. I should mention that oil is typically transferred from containers into the oil cups by suspending a small quantity between the tips of a pair of tweezers. Even though the cups only store a few drops, it will generally last quite some time because such small amounts are used on watch movements. In fact, it’s a good idea to clean out these cups periodically, even if they are not empty, because the oil stored in them will start to gradually pick up dust and debris as it is used.


Lubricants
There are a huge variety of watch oils out there, some with quite-specific applications, so figuring out what you need can be confusing. Here’s what I recommend you start with:
A lightweight, low-viscosity oil for use on high-velocity jeweled bearings - particularly the balance, excape wheel, 3rd, and 2nd wheel bearings. I recommend Moebius 9010.
A medium-weight oil suitable for heavier, lower-velocity applications, including the center wheel, mainspring arbor, and parts of the keyless and motion works. I recommend Moebius 1300.
A heavyweight grease for high-friction, high load metal-on-metal applications, particularly in the keyless works. I recommend Moebius 9504
I will cover some additional lubricants that you may want to add to your bench in the Advanced Tools Guide.
Regulation Tools
Timegrapher
So, you’ve managed to get your watch movement back together, and it’s running. It’s an amazing feeling, but you still need to make sure it’s actually running well and telling time properly. Adjusting the watch so that it is actually keeping good time is called watch regulation. This is quite difficult to do without a timegrapher, a device that uses acoustic information from the watch to provide you with an accurate assessment of its timekeeping performance – whether it is running fast or slow – as well as other, closely related stats such as amplitude and beat error.
If you search on Amazon you will see many identical-looking timegraphers for sale under different names. These are, in fact, all the same, made by a Chinese company called Weishi, and while I have provided an Amazon link for convenience I will say that you can get the same devices for significantly less on AliExpress.
If you’d like to dive into how to regulate a watch, together with some tips to help solve challenging performance issues, check out my Regulation Guide

Where to Buy Tools
If you’ve paid any attention to the links above, it will be obvious that almost all of these basic tools can be purchased on Amazon. This can be a convenient place to buy tools, particularly if you are a Prime member, but it’s not always the cheapest or best option. Other sources you should consider include:
AliExpress. There are a huge variety of watchmaker tools and materials available here, including many more sophisticated tools that you won’t find listed on Amazon. Quality varies widely, and some items aren’t described (in English) very well, but I have some Chinese tools from AliExpress that are very well made and compare favorably to extremely expensive Swiss brands, so you just have to shop around a bit. If the price seems too good to be true, it probably is. Often, the same Chinese-made tools you see for sale on Amazon may be available on AliExpress for significantly less. Just be patient - shipping from China can take a while.
Walmart.com is a direct Amazon competitor and carries many of the same items. Pricing, as well as the shopping experience, is generally similar to Amazon, although you can occasionally find items that have a significantly different price on one or the other.
Specialist watchmaker shops. Some of the prominent ones that I use regularly are Esslinger, Otto Frei, and Cas-Ker. These outfits don’t always have the best pricing (although occasionally they beat listing on places like Amazon, so it’s worth checking), and the websites can be, frankly, pretty awful to navigate, but they have items that are difficult or impossible to find elsewhere. They are particularly good sources of certain replacement parts you might need, like crystals and mainsprings.