Movement Stories: Chronograph Service - Venus 188
As complications go, the chronograph is both prized and something of a Mt. Everest for amateur watchmakers. In this article, I’m going to walk through re-assembly of a “typical” (if there is such a thing) cam-driven vintage chronograph movement, the Venus 188, to show that - if you’re systematic - there’s nothing to be afraid of. I’ll also talk about adjustment and tuning of the chronograph functions.
Buried underneath all of that chronograph complexity lies what is actually a very basic watch movement, pictured below. The simple layout actually closely resembles a pocket watch, with a sub-second-bearing 4th wheel sitting opposite the crown and the mainspring barrel placed on the clockwise side of the crown wheel (when looking at the watch from the dial side) rather than the counter clockwise side more typical in wristwatch movements. I won’t spend much time on this part of the movement since it is so straighfoward.


Many, if not most, vintage chronograph movements place the crown and ratchet wheels underneath the barrel bridge in order to keep the top surface clear for chronograph parts. The Venus 188 doesn’t do this, which is nice because it makes the bridge easier to install and you can access the click more easily if you need to let down mainspring power. However, it does mean that there is a secondary plate that needs to be installed over the winding components before the chronograph can be reassembled.
Before installing this plate, it’s a good idea to kick things off by installing the return spring for the chronograph operating levers, as it’s more difficult to place afterwards. This spring sits behind lips on either side of the pusher holes and wraps around a post in between the pushers. Be careful when intalling it as it’s under a fair amount of tension:

Venus 188 operating lever return spring in place
With that out of the way, the chronograph mounting plate can be installed over the barrel bridge. It is held by two screws, circled in red in the image below:

Venus 188 with secondary mounting plate for the chronograph installed
Now the reassembly of the chronograph can begin in earnest. You may notice, looking at the image above, that several screws were left in place on the movement plates when the chronograph was disassembled. Not all of these are screws - some are eccentrics used to adjust the movement, but in general this is a common practice when working on chronographs to avoid mixing up the (many) different screws that are involved. I will typically remove screws and clean them separately when they are sufficiently distinct that I can easily identify them, while leaving others in place if I am worried about potentially mixing them up.
In any event, we still have an intimidatingly large pile of parts to deal with at this point:

Pile of Venus 188 chronograph parts
The parts that make up a chronograph mechanism are typically stacked across several distinct layers, so there is often a natural assembly order proceeding from bottom to top. It’s a good idea to make a note of this structure, and take photos, when disassembling the movement as it helps guide the reassembly. When you approach things in the right order, the chronograph should come together relatively easily.
Often the “lowest” part in the layered mechanism is the slide gear assembly, which drives the minute recording runner. The 188 is no exception, so we’ll install that first:

Venus 188 slide gear assembly
Notice the tension spring design. Earlier versions of the Venus 188 that I have worked on use a completely different design for this tension spring, shown in the inset in the photo above. Venus is rather notorious for making significant design changes in their movements without updating the movement caliber code - at least not in any way that’s visible on the watch - so you need to be a bit cautious with these movements when sourcing replacement parts. It’s good to have photos to make sure you’re getting the right thing!
The contact and pivot points here are greased or lubricated with Moebius 1300. This is done throughout the chronograph assembly. It’s important for all of these parts to move freely and with minimal friction in order for the chronograph to function properly.
The next part to reinstall is the coupling clutch, but this was disassembled for cleaning so first needs to be reassembled, as show below:


The completed coupling clutch assembly can then be replaced on the movement as shown below:

Venus 188 coupling clutch installed
Note that the coupling clutch, like the slide gear, has a tension spring, but I recommend not installing it at this point, as we want to be able to rotate the clutch freely. We’ll get to that tension spring later.
At this point it’s a good time to install both the chronograph drive wheel and the runners. The drive wheel is friction fit onto the extended post for the 4th wheel. When reinstalling it, push it down gradually and check that it aligns with and is level with the coupling clutch wheel. The runners are held by a jeweled bridge. Once those parts are in place the movement should look like this:

Now it’s time to install the hammer assembly. This is actually the “brains” of a cam-driven chronograph, as its position controls the start, stop and reset functions. Crown-wheel chronographs use a completely different mechamism, which I won’t cover here (maybe a future article?). The crown wheel design tends to be “preferred,” largely because it provides a lighter, more positive feel for the start/stop pusher, but crown wheel designs tend to be more complex and delicate, and it’s hard to beat the simple reliability of a well-designed cam-driven chronograph.
The hammer assembly in the Venus 188 is actually a sandwich of multiple parts. These can be disassembled, but there’s really no reason to do so just for cleaning purposes, as not of the parts move relative to the others. Once the hammer is installed things should look like this:
Venus 188 hammer assembly in place
Note that it’s important to make sure the interface between the hammer and the heart-shaped cams attached to the runner wheels is lubricated. I find it easier to do this by lubricating the ends of the hammer, but you can also lubricate the cams directly if you prefer.
The next part to install is the cam spring for the hammer assembly:

Venus 188 hammer cam spring installed
Now is a good time to return to the coupling clutch and install the tension spring that pushes it to engage with the main chronograph runner:

Venus 188 cam tension spring
At this point, you should be able to test the chronograph functions by manually moving the hammer between the three positions established by the cam spring interface - running, stopped, and reset.
Of course the chronograph wouldn’t be much use if you could only control it this way, so now it’s time to reinstall the operating levers that allow the functions to be controlled via the chronograph’s two pushers. We’ll start with the fly back lever, which resets the runners, as this is the simplest. It bolts on with a reverse-threaded screw, which is (thankfully) marked as such with three parallel lines. The lever also has a pin on the end that nestles into a cutout in the chronograph plate, preventing the lever from pivoting beyond the edge of the movement:

Venus 180 fly back lever installed
It may be tempting to test the fly back lever function at this point, but I don’t recommend it since, until the start/stop operating lever is also in place, it’s possible to dislodge the return spring that we installed all the way back at the beginning. So, let’s install the start/stop operating lever. Once again, this is held in place by and pivots around a reverse-threaded screw:

Venus 188 start/stop operating lever
The start/stop operating lever actually engages with the hammer assembly via a pivoting reverser arm. Installing this arm and connecting it to the operating lever is actually the trickiest part of the entire reassembly process. The reverser slips underneath the hammer assembly, and is attached via a screw that seats into a threaded hole in the end of the operating lever. This end of the operating lever sits underneath a slot cut in the chronograph plate, and the screw needs to pass through this slot. Meanwhile, a spring clip attached to the operating lever needs to sit on the upper edge of the reverser, immediately adjacent to the screw. Since the operating lever is under tension from the return spring, all of these parts need to be held in place while the screw is seated. In the photo below, you can see me using a finger to align these parts before screwing everything together, with the screw location circled in red:

Aligning the Venus 188 reverser with the operating lever before screwing them together
With that last tricky bit out of the way, there’s only one part left - the minute recorder jumper spring. While this could have been installed earlier, it’s a good idea to finish up everthing else, including installing the operating levers, because this spring is extremely delicate and easy to bend or damage if mishandled. This spring is held by a slotted screw that allows for position adjustment, and it should be ajusted to that the head of the spring sits evenly between the teeth of the minute runner when it is in the reset position, as shown below:

Venus 188 minute recorder jumper
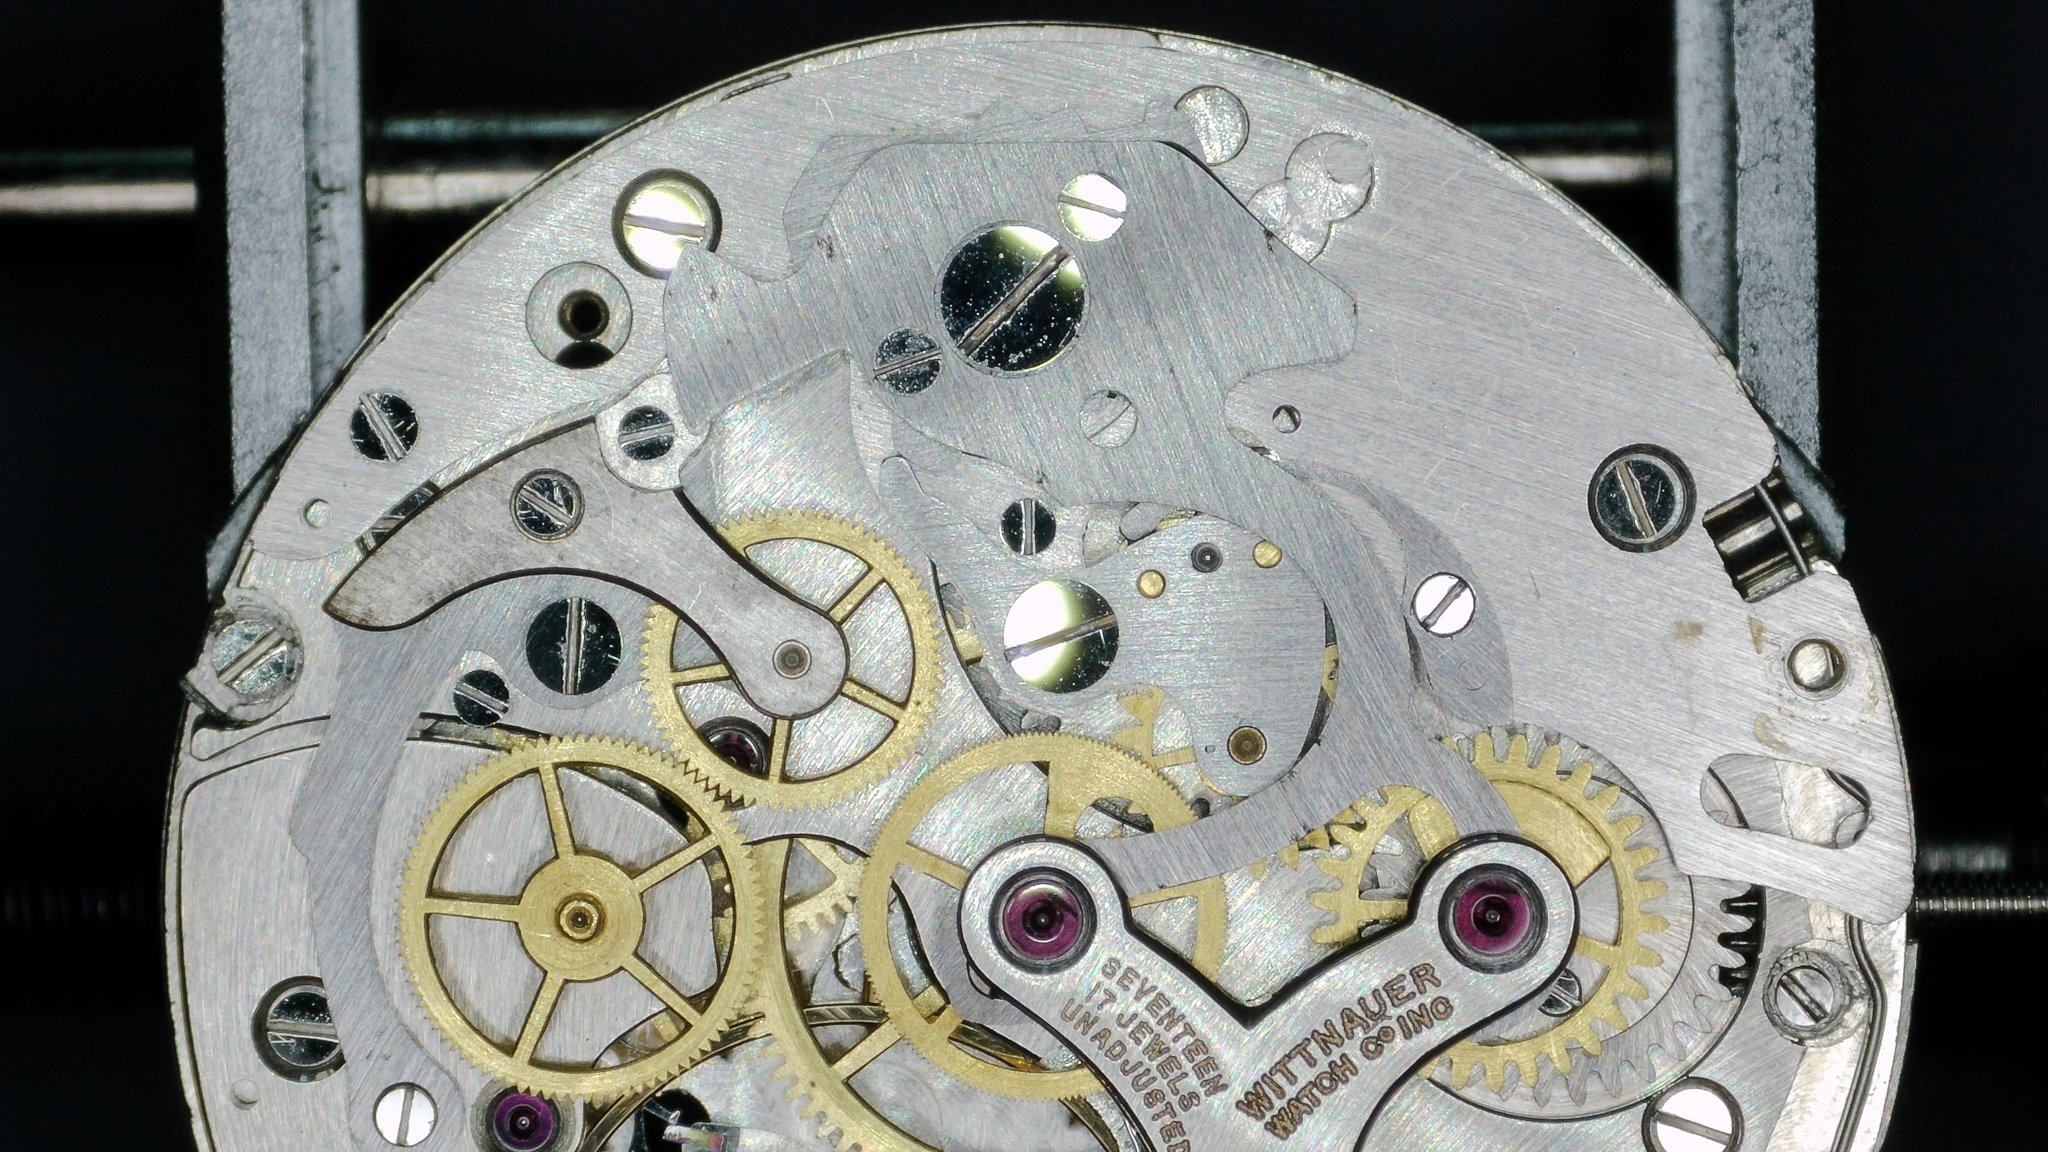
At this point, everything should be running:
The chronograph may still need some adjustment. Adjustments are made by way of eccentrics (these have slotted heads and look just like screws, but aren’t threaded). The Venus 188 has four of them, which are marked in the image below:
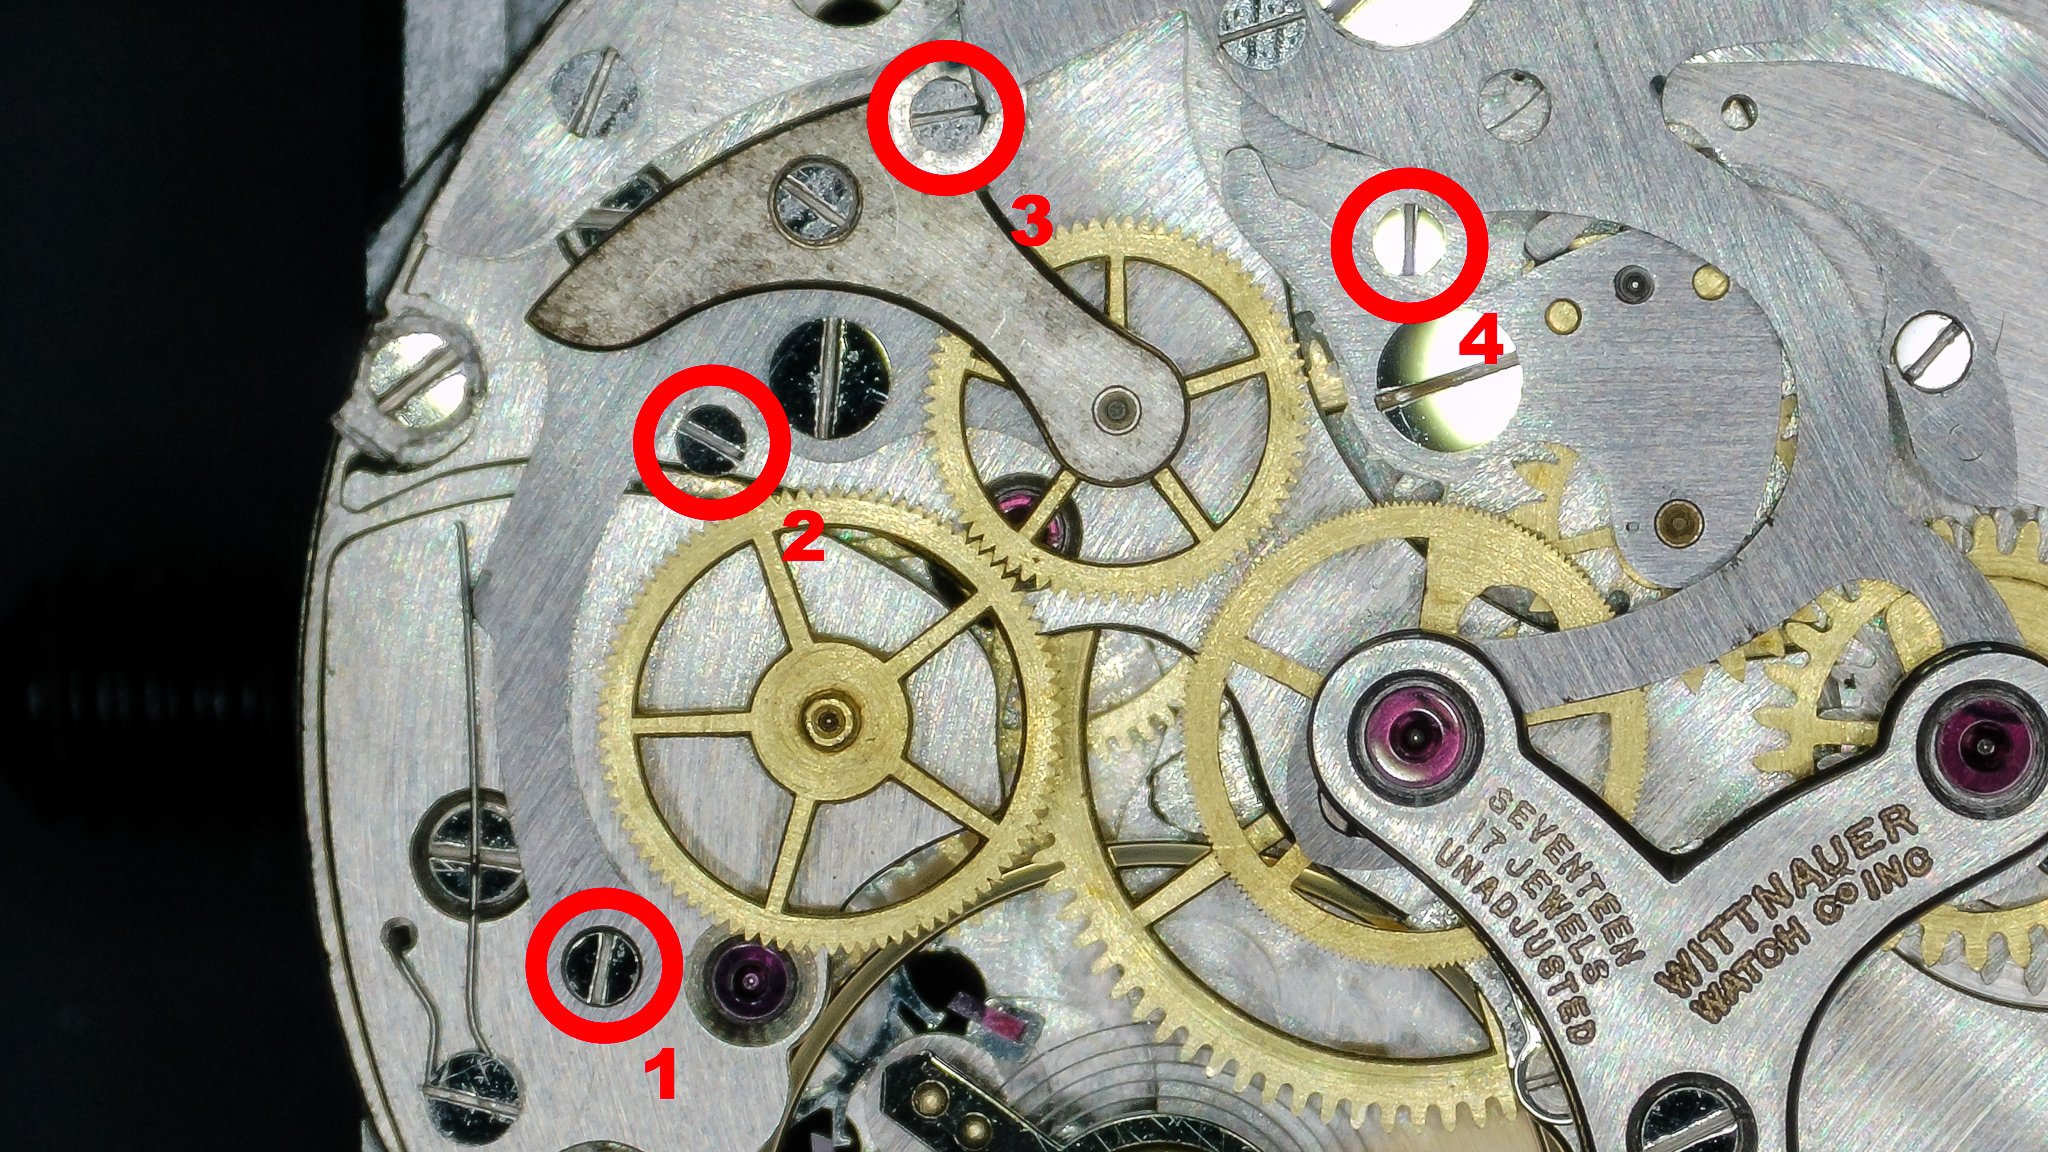
Venus 188 eccentric adjusters
These eccentrics operate as follows:
#1 - This adjusts the distance between the driving wheel and the coupling clutch wheel. You want to adjust this so that the wheels mesh smoothly when the chronograph is in the running position. If this adjustment is too tight, the mechanism will tend to bind and stop the watch. If it’s too loose, there will be excessive slop when driving the runner (note that you should expect to see a bit of “slop” when the chronograph isn’t running and the clutch wheel is not under torque).
#2 - This adjusts the pressure of the clutch wheel against the runner when the chronograph is running. As with #1, you want to adjust this so that the runner turns smoothly and doesn’t “skip,” but if you back this off so that the full pressure of the coupling clutch spring is pressing the clutch wheel against the runner, you may have issues with binding.
#3 - This adjusts the amount of separation between the coupling clutch wheel and the runner when the chronograph is stopped. It rarely requires adjustment in my experience, but if the start/stop function isn’t working smoothly it may need to be tweaked.
#4 - This adjusts the position of the slide gear relative to the main chronograph runner, which is critical to the function of the minute counter. This is simultaneously the mechanism most likely to need adjustment and the most challenging thing to adjust properly, so I’ll go into a bit more depth below.
The slide gear adjustment is tricky. When the chronograph runner completes a full rotation, a single tooth on the runner engages with the slide gear to increment the minute counter. If the slide gear is too far from the runner this tooth will “miss,” and the minute counter won’t work. On the other hand, if the slide gear is too close, the runner tooth will end up hitting the tooth of the slide gear a second time, which can cause the minute counter to, wiggle, jump or even fully increment to the next minute. In extreme cases it can cause the entire mechanism to bind and stop the watch. This adjustment is challenging because the difference between these two adjustment extremes is quite small. so very small turns of the eccentric can have a large impact. It may take some fiddling, trial and error to get everything working perfectly. The video below illustrates how the mechanism works when adjusted properly:
And there you have it! The Venus 188 is only one example of a chronograph movement, and you’ll find that different vintage chonograph movements from the likes of Venus, Landeron, and Valjoux all have their own challenges and design quirks, but the overall process outlined here translates fairly well across movements. Happy watchmaking!